之前因为需要,研究了一下ART的相关源码,也做了一些记录与总结,现在重新整理了一下与大家共同讨论和交流一下。
ART是Android平台上的新一代运行时,用来代替dalvik。它主要采用了AOT的方法,在apk安装的时候将dalvikbytecode一次性编译成arm本地指令(但是这种AOT与c语言等还是有本质不同的,还是需要虚拟机的环境支持),这样在运行的时候就无需进行任何解释或编译便可直接执行,节省了运行时间,提高了效率,但是在一定程度上使得安装的时间变长,空间占用变大。
从Android的源码上看,ART相关的内容主要有compiler和与之相关的程序dex2oat、runtime、Java调试支持和对oat文件进行解析的工具oatdump。
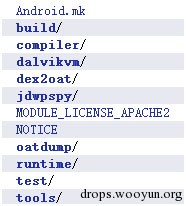
下面这张图是ART的源码目录结构:

中间有几个目录比较关键,
首先是dex2oat,负责将dex文件给转换为oat文件,具体的翻译工作需要由compiler来完成,最后编译为dex2oat;
其次是runtime目录,内容比较多,主要就是运行时,编译为libart.so用来替换libdvm.so,dalvik是一个外壳,其中还是在调用ART runtime;
oatdump也是一个比较重要的工具,编译为oatdump程序,主要用来对oat文件进行分析并格式化显示出文件的组成结构;
jdwpspy是java的调试支持部分,即JDWP服务端的实现。
oat文件的格式,可以从dex2oat和oatdump两个目录入手。简单的说,oat文件是嵌套在一个elf文件的格式中的。在elf文件的动态符号表中有三个重要的符号:oatdata、oatexec、oatlastword,分别表示oat的数据区,oat文件中的native code和结束位置。这些关系结构在图中说明的很清楚,简单理解就是在oatdata中,保存有原来的dex文件内容,在头部还保留了寻址到dex文件内容的偏移地址和指向对应的oat class偏移,oat class中还保存了对应的native code的偏移地址,这样也就间接的完成了dexbytecode和native code的对应关系。
具体的一些代码可以参考/art/dex2oat/dex2oat.cc中的static int dex2oat(intargc, char** argv)函数和/art/oatdump/oatdump.cc的static intoatdump(intargc, char** argv)的函数,可以很快速的理解oat文件的格式和解析。在/art/compiler/elf_writer_quick.cc中的Write函数很值得参考。
ART运行时的启动过程很早,是由zygote所启动的,与dalvik的启动过程完全一样,保证了由dalvik到ART的无缝衔接。
整个启动过程是从app_processs(/frameworks/base/cmds/app_process/app_main.cpp)开始的,创建了一个对象AppRuntime runtime,这个是一个单例,整个系统运行时只有一个。随着zygote的fork过程,只是在不断地复制指向这个对象的指针个每个子进程。然后就开始执行runtime.start方法。这个方法里先调用startVm启动虚拟机。是由JNI_CreateJavaVM方法具体执行的的,即/art/runtime/jni_internal.cc的 extern "C" jintJNI_CreateJavaVM(JavaVM** p_vm, JNIEnv** p_env, void* vm_args)。然后调用startReg注册一些native的method。在最后比较重要的是查找到要执行的java代码的main方法,然后执行进入托管代码的世界,这也是我们感兴趣的地方。
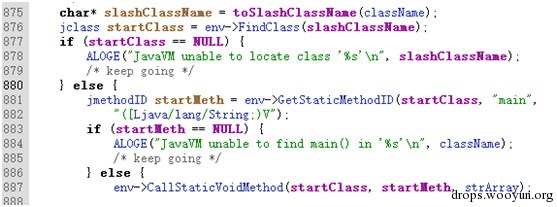
如图,最后调用的是CallStaticVoidMethod,去看看它的实现:

再去寻找InvokeWithVarArgs:

跳到InvokeWithArgArray:

可以看到一个很关键的class:

即ArtMethod,它的一个成员方法就是负责调用oat文件中的native code的:

最后这就是最终的入口:
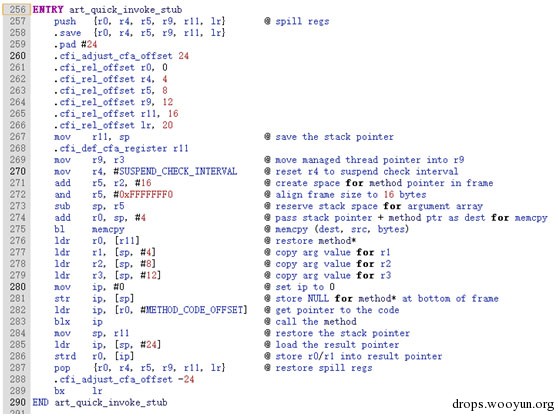
283行的blxip指令就是最终进入native code的位置。可以大致得到结论,通过查找相关的oat文件,得到所需要的类和方法,并将其对应的native code的位置放入ArtMethod结构,最后通过Invoke成员完成调用。下一步的工作需要着重关注的便是native code代码调用其他的java方法时如何去通过运行时定位和跳转的。
注意注释中描述了ART下的ABI,与标准的ARM调用约定相似,但是R0存放的是调用者的方法的ArtMethod对象地址,R0-R3包含的才是参数,包括this。多余的存放在栈中,从SP+16的位置开始。返回值同样通过R0/R1传递。R9指向运行时分配的当前的线程对象指针。
类加载的任务主要由ClassLinker类来负责,先看一下这个过程的顺序图:
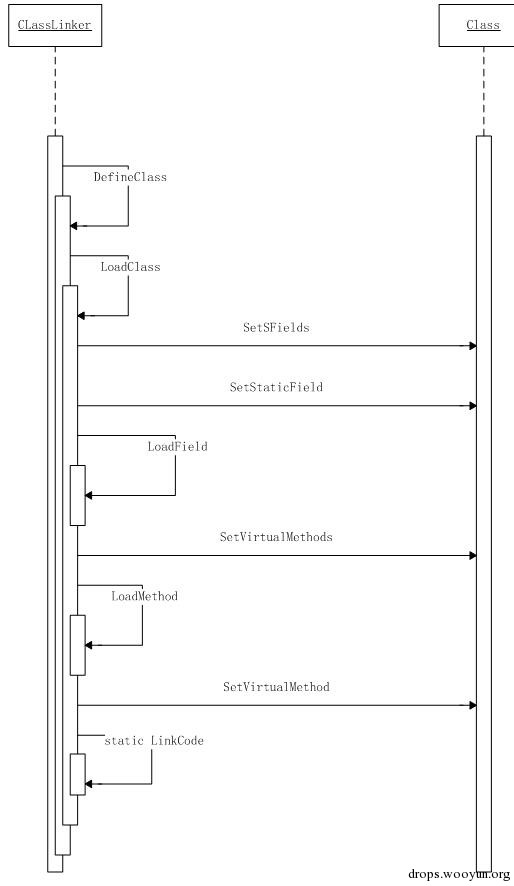
顺序图中以静态成员的初始化和虚函数的初始化为例,描述了调用的逻辑。下面进行详细的叙述。
从FindClass开始:
#!java
mirror::Class* ClassLinker::FindClass(constchar* descriptor, mirror::ClassLoader* class_loader) {
……
mirror::Class* klass = LookupClass(descriptor, class_loader);
if (klass != NULL) {
returnEnsureResolved(self, klass);
  }
if (descriptor[0] == '[') {
returnCreateArrayClass(descriptor, class_loader);

  } elseif (class_loader == NULL) {
DexFile::ClassPathEntry pair = DexFile::FindInClassPath(descriptor, boot_class_path_);
if (pair.second != NULL) {
returnDefineClass(descriptor, NULL, *pair.first, *pair.second);
    }
……
}
省略次要的代码,首先利用LookupClass查找所需要的类是否被加载,对于此场景所以不符合此条件。然后判断是否是数组类型的类,也跳过此分支,进入到我们最感兴趣的DefineClass中。
#!java
mirror::Class* ClassLinker::DefineClass(constchar* descriptor,
                                        mirror::ClassLoader* class_loader,
constDexFile&dex_file,
constDexFile::ClassDef&dex_class_def) {
……
SirtRef<mirror::Class>klass(self, NULL);
if (UNLIKELY(!init_done_)) {
// finish up init of hand crafted class_roots_
if (strcmp(descriptor, "Ljava/lang/Object;") == 0) {
klass.reset(GetClassRoot(kJavaLangObject));
    } elseif (strcmp(descriptor, "Ljava/lang/Class;") == 0) {
klass.reset(GetClassRoot(kJavaLangClass));
    } elseif (strcmp(descriptor, "Ljava/lang/String;") == 0) {
klass.reset(GetClassRoot(kJavaLangString));
    } elseif (strcmp(descriptor, "Ljava/lang/DexCache;") == 0) {
klass.reset(GetClassRoot(kJavaLangDexCache));
    } elseif (strcmp(descriptor, "Ljava/lang/reflect/ArtField;") == 0) {
klass.reset(GetClassRoot(kJavaLangReflectArtField));
    } elseif (strcmp(descriptor, "Ljava/lang/reflect/ArtMethod;") == 0) {
klass.reset(GetClassRoot(kJavaLangReflectArtMethod));
    } else {
klass.reset(AllocClass(self, SizeOfClass(dex_file, dex_class_def)));
    }
  } else {
klass.reset(AllocClass(self, SizeOfClass(dex_file, dex_class_def)));
  }
klass->SetDexCache(FindDexCache(dex_file));
LoadClass(dex_file, dex_class_def, klass, class_loader);
……
returnklass.get();
}
拣重要的部分看,这个方法基本上完成了两个个功能,即从dex文件加载类和加载过的类插入一个表中,供LookupClass查询。
我们关注第一个功能,首先是进行一些内置类的判断,对于自定义的类则是手动分配空间、,然后查找相关的dex文件,最后进行加载。
接着看LoadClass方法:
#!java
voidClassLinker::LoadClass(constDexFile&dex_file,
constDexFile::ClassDef&dex_class_def,
SirtRef<mirror::Class>&klass,
                            mirror::ClassLoader* class_loader) {
……
// Load fields fields.
const byte* class_data = dex_file.GetClassData(dex_class_def);
if (class_data == NULL) {
return;  // no fields or methods - for example a marker interface
  }
ClassDataItemIteratorit(dex_file, class_data);
  Thread* self = Thread::Current();
if (it.NumStaticFields() != 0) {
    mirror::ObjectArray<mirror::ArtField>* statics = AllocArtFieldArray(self, it.NumStaticFields());
if (UNLIKELY(statics == NULL)) {
CHECK(self->IsExceptionPending());  // OOME.
return;
    }
klass->SetSFields(statics);
  }
if (it.NumInstanceFields() != 0) {
    mirror::ObjectArray<mirror::ArtField>* fields =
AllocArtFieldArray(self, it.NumInstanceFields());
if (UNLIKELY(fields == NULL)) {
CHECK(self->IsExceptionPending());  // OOME.
return;
    }
klass->SetIFields(fields);
  }
for (size_ti = 0; it.HasNextStaticField(); i++, it.Next()) {
SirtRef<mirror::ArtField>sfield(self, AllocArtField(self));
if (UNLIKELY(sfield.get() == NULL)) {
CHECK(self->IsExceptionPending());  // OOME.
return;
    }
klass->SetStaticField(i, sfield.get());
LoadField(dex_file, it, klass, sfield);
  }
for (size_ti = 0; it.HasNextInstanceField(); i++, it.Next()) {
SirtRef<mirror::ArtField>ifield(self, AllocArtField(self));
if (UNLIKELY(ifield.get() == NULL)) {
CHECK(self->IsExceptionPending());  // OOME.
return;
    }
klass->SetInstanceField(i, ifield.get());
LoadField(dex_file, it, klass, ifield);
  }

UniquePtr<constOatFile::OatClass>oat_class;
if (Runtime::Current()->IsStarted() && !Runtime::Current()->UseCompileTimeClassPath()) {
oat_class.reset(GetOatClass(dex_file, klass->GetDexClassDefIndex()));
  }

// Load methods.
if (it.NumDirectMethods() != 0) {
// TODO: append direct methods to class object
    mirror::ObjectArray<mirror::ArtMethod>* directs =
AllocArtMethodArray(self, it.NumDirectMethods());
if (UNLIKELY(directs == NULL)) {
CHECK(self->IsExceptionPending());  // OOME.
return;
    }
klass->SetDirectMethods(directs);
  }
if (it.NumVirtualMethods() != 0) {
// TODO: append direct methods to class object
    mirror::ObjectArray<mirror::ArtMethod>* virtuals =
AllocArtMethodArray(self, it.NumVirtualMethods());
if (UNLIKELY(virtuals == NULL)) {
CHECK(self->IsExceptionPending());  // OOME.
return;
    }
klass->SetVirtualMethods(virtuals);
  }
size_tclass_def_method_index = 0;
for (size_ti = 0; it.HasNextDirectMethod(); i++, it.Next()) {
SirtRef<mirror::ArtMethod>method(self, LoadMethod(self, dex_file, it, klass));
if (UNLIKELY(method.get() == NULL)) {
CHECK(self->IsExceptionPending());  // OOME.
return;
    }
klass->SetDirectMethod(i, method.get());
if (oat_class.get() != NULL) {
LinkCode(method, oat_class.get(), class_def_method_index);
    }
method->SetMethodIndex(class_def_method_index);
class_def_method_index++;
  }
for (size_ti = 0; it.HasNextVirtualMethod(); i++, it.Next()) {
SirtRef<mirror::ArtMethod>method(self, LoadMethod(self, dex_file, it, klass));
if (UNLIKELY(method.get() == NULL)) {
CHECK(self->IsExceptionPending());  // OOME.
return;
    }
klass->SetVirtualMethod(i, method.get());
    DCHECK_EQ(class_def_method_index, it.NumDirectMethods() + i);
if (oat_class.get() != NULL) {
LinkCode(method, oat_class.get(), class_def_method_index);
    }
class_def_method_index++;
  }
……
}
为了弄清这个方法,我们先得看看Class类利用了什么重要的成员:
#!java
ObjectArray<ArtMethod>* direct_methods_;
// instance fields
// specifies the number of reference fields.
ObjectArray<ArtField>* ifields_;
// For every interface a concrete class implements, we create an array of the concrete vtable_
// methods for the methods in the interface.
IfTable* iftable_;
// Static fields
ObjectArray<ArtField>* sfields_;
// The superclass, or NULL if this is java.lang.Object, an interface or primitive type.
// Virtual methods defined in this class; invoked through vtable.
ObjectArray<ArtMethod>* virtual_methods_;
// Virtual method table (vtable), for use by "invoke-virtual".  The vtable from the superclass is
// copied in, and virtual methods from our class either replace those from the super or are
// appended. For abstract classes, methods may be created in the vtable that aren't in
// virtual_ methods_ for miranda methods.
ObjectArray<ArtMethod>* vtable_;
// Total size of the Class instance; used when allocating storage on gc heap.
// See also object_size_.
size_tclass_size_;
这样就比较清晰了。LoadClass首先读取dex文件中的classdata,然后初始化一个迭代器来对classdata中的数据进行遍历。接下来分部分进行:
分配一个对象ObjectArray来表示静态成员,并利用静态成员的数量初始化,并将这个对象的地址赋值给Class的sfields_成员。
同样的完成Class的ifields_成员的初始化,用来表示私有数据成员
接下来,遍历静态成员,对于每个成员分配一个Object对象,然后将地址放入之前分配的ObjectArray数组中,并将dex文件中的相关信息加载到Object对象中,从而完成了静态成员信息的读取。
同理,完成了私有成员信息的读取。
像对于数据成员一样,分配一个ObjectArray用于表示directmethod,并用于初始化direct_methods_成员。
同理,初始化了virtual_methods_成员。
遍历directmethod成员,对于每一个directmethod生成一个ArtMethod对象,并在构造函数中通过LoadMethod完成dex文件中相应信息的读取。再将ArtMethod对象放入之前的ObjectArray中,还需要利用LinkCode将实际的方法代码起始地址用来初始化ArtMethod的entry_point_from_compiled_code_成员,最后更新每个ArtMethod的method_index_成员用于方法索引查找。
同样的过程完成了对于VirtualMethod的处理
最终就完成了类的加载。
下面需要再关注一下一个类实例化的过程。
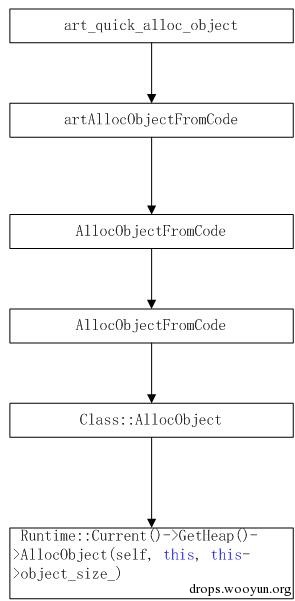
类的实例化是通过TLS(线程局部存储)中的一个函数表中的pAllocObject来进行的。pAllocObject这个函数指针被指向了art_quick_alloc_object函数。这个函数是与硬件相关的,实际上它又调用了artAllocObjectFromCode函数,又调用了AllocObjectFromCode函数,在完成了一系列检查判断后调用了Class::AllocObject,这个方法很简单,就是一句话:
returnRuntime::Current()->GetHeap()->AllocObject(self, this, this->object_size_)
其实是在堆上根据之前LoadClass时指定的类对象的大小分配了一块内存,按照一个Object对象指针返回。
可以以图形来展示一下:
看一下最后调用的这个函数:
#!java
mirror::Object* Heap::AllocObject(Thread* self, mirror::Class* c, size_tbyte_count) {
……
obj = Allocate(self, alloc_space_, byte_count, &bytes_allocated);
 ……
if (LIKELY(obj != NULL)) {
obj->SetClass(c);
   ……
returnobj;
  } else {
   ……
}
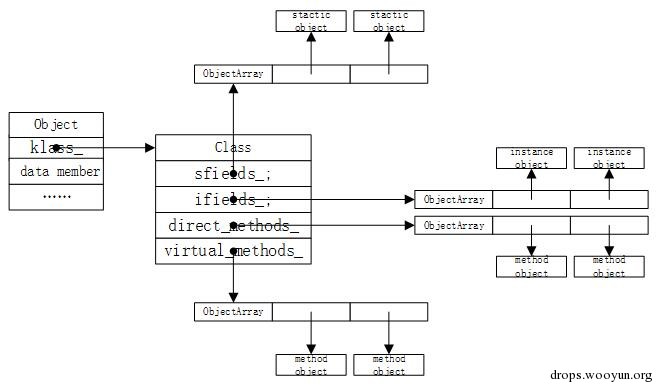
在这个函数中分配了内存空间之后,还调用了SetClass这个关键的函数,把Object对象中的klass_成员利用LoadClass的结果初始化了。
这样的话一个完整的类的实例化的内存结构就如图所示了:
关于ART的编译过程,主要是由dex2oat程序启动的,所以可以从dex2oat入手,先画出整个过程的顺序图。
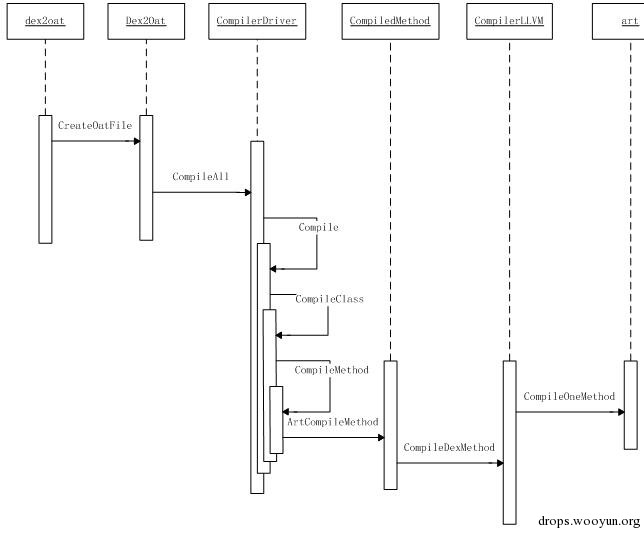
上图是第一阶段的流程,主要是由dex2oat调用编译器的过程。
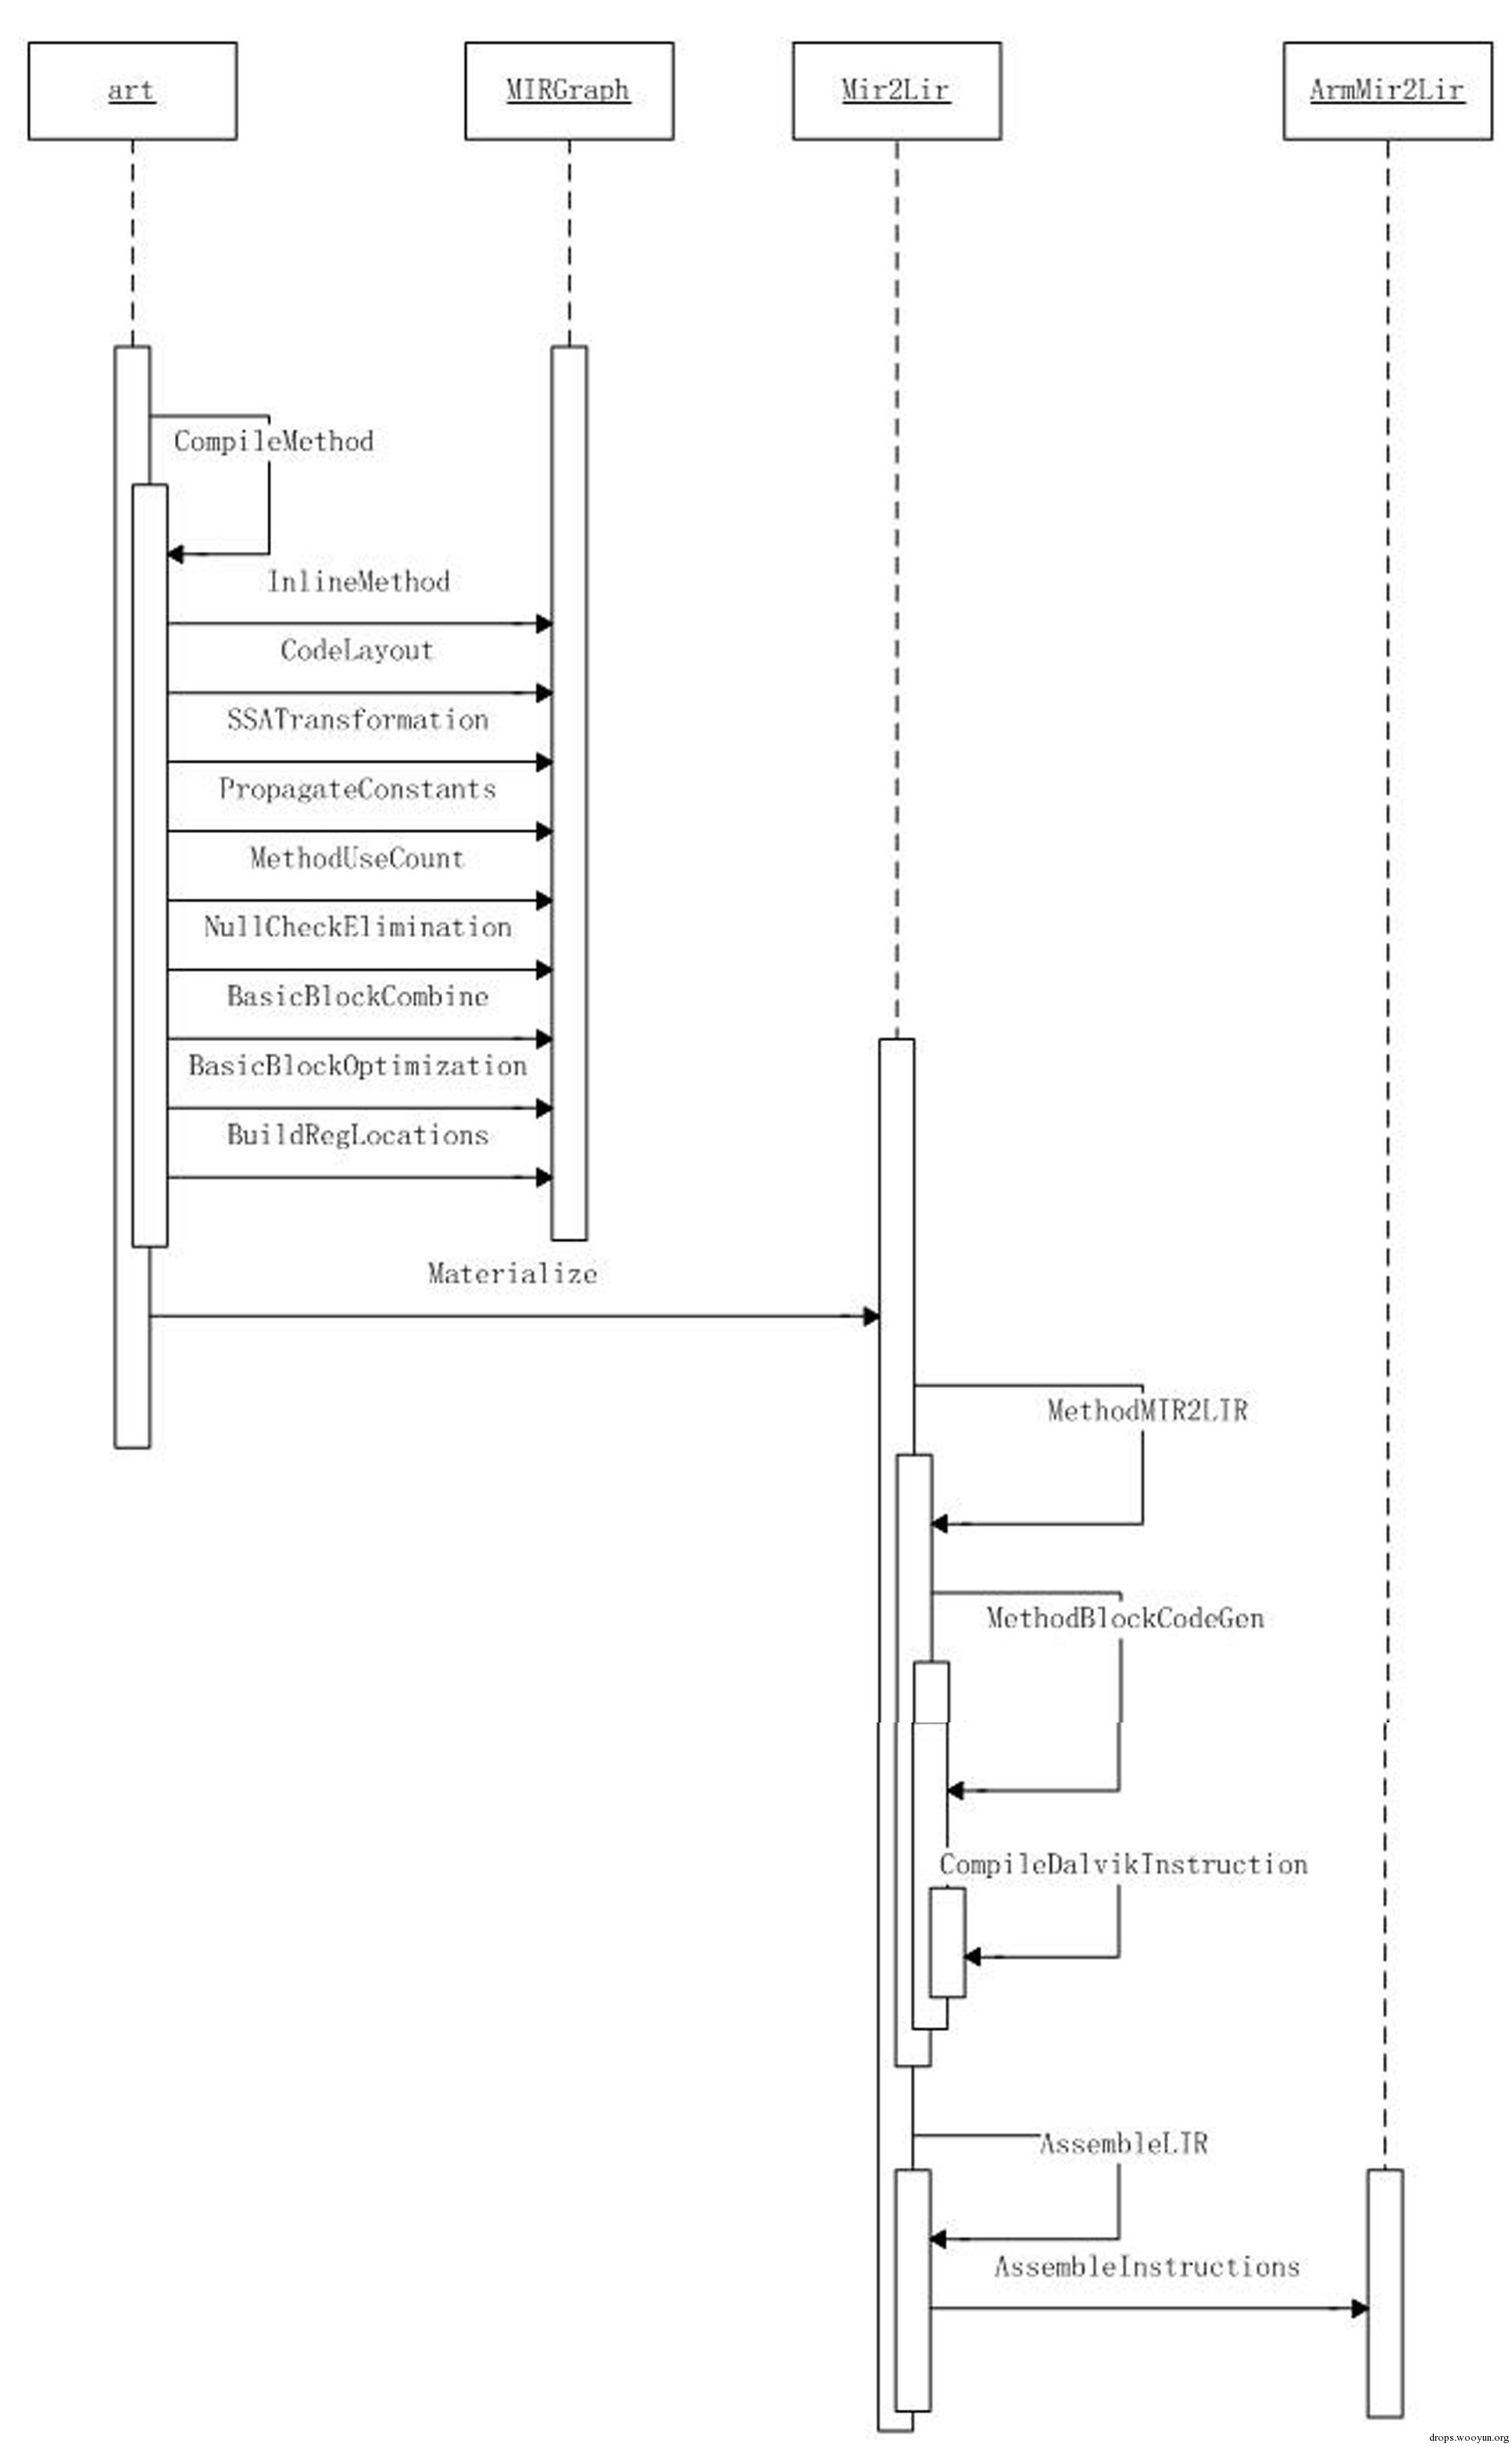
第二阶段主要是进入编译器的处理流程,通过对dalvik指令进行一次编译为MIR,然后二次编译为LIR,最后编译成ARM指令。
下面择要对关键代码进行整理:
#!java
staticintdex2oat(intargc, char** argv){
……
UniquePtr<constCompilerDriver>compiler(dex2oat->CreateOatFile(boot_image_option,
host_prefix.get(),
android_root,
is_host,
dex_files,
oat_file.get(),
bitcode_filename,
image,
image_classes,
dump_stats,
timings));
……
}
在这个函数的调用中,主要进行的多线程进行编译
#!java
voidCompilerDriver::CompileAll(jobjectclass_loader,
conststd::vector<constDexFile*>&dex_files,
base::TimingLogger&timings)
{
……
Compile(class_loader, dex_files, *thread_pool.get(), timings);
……
}

voidCompilerDriver::Compile(jobjectclass_loader,
conststd::vector<constDexFile*>&dex_files,
ThreadPool&thread_pool, base::TimingLogger&timings) {
……
CompileDexFile(class_loader, *dex_file, thread_pool, timings);
……
}
一直到
#!java
voidCompilerDriver::CompileDexFile(jobjectclass_loader,
constDexFile&dex_file,ThreadPool&thread_pool,
base::TimingLogger&timings) {
……
context.ForAll(0, dex_file.NumClassDefs(),
CompilerDriver::CompileClass, thread_count_);
……
}
启动了多线程,执行CompilerDriver::CompileClass函数进行真正的编译过程。
#!java
voidCompilerDriver::CompileClass(constParallelCompilationManager* manager, size_tclass_def_index) {
……
ClassDataItemIteratorit(dex_file, class_data);
CompilerDriver* driver = manager->GetCompiler();
int64_tprevious_direct_method_idx = -1;
while (it.HasNextDirectMethod()) {
uint32_tmethod_idx = it.GetMemberIndex();
if (method_idx == previous_direct_method_idx) {
it.Next();
continue;
    }
previous_direct_method_idx = method_idx;
driver->CompileMethod(it.GetMethodCodeItem(),
    it.GetMemberAccessFlags(),
    it.GetMethodInvokeType(class_def),class_def_index,
    method_idx, jclass_loader, dex_file,
    dex_to_dex_compilation_level);
it.Next();
  }
int64_tprevious_virtual_method_idx = -1;
while (it.HasNextVirtualMethod()) {
uint32_tmethod_idx = it.GetMemberIndex();
if (method_idx == previous_virtual_method_idx) {
it.Next();
continue;
    }
previous_virtual_method_idx = method_idx;
driver->CompileMethod(it.GetMethodCodeItem(),
    it.GetMemberAccessFlags(),
    it.GetMethodInvokeType(class_def), class_def_index,
    method_idx, jclass_loader, dex_file,
    dex_to_dex_compilation_level);
it.Next();
  }
主要过程就是通过读取class中的数据,利用迭代器遍历每个DirectMethod和VirtualMethod,然后分别对每个Method作为单元利用CompilerDriver::CompileMethod进行编译。
CompilerDriver::CompileMethod函数主要是调用了CompilerDriver::CompilerDriver* constcompiler_这个成员变量(函数指针)。
这个变量是在CompilerDriver的构造函数中初始化的,根据不同的编译器后端选择不同的实现,不过基本上的流程都是一样的,通过对Portable后端的分析,可以看到最后调用的是static CompiledMethod* CompileMethod函数。
#!java
staticCompiledMethod* CompileMethod(CompilerDriver&compiler,
constCompilerBackendcompiler_backend,
constDexFile::CodeItem* code_item,
uint32_taccess_flags, InvokeTypeinvoke_type,
uint16_tclass_def_idx, uint32_tmethod_idx,
jobjectclass_loader, constDexFile&dex_file
#ifdefined(ART_USE_PORTABLE_COMPILER)
 , llvm::LlvmCompilationUnit* llvm_compilation_unit
#endif
) {
……
    cu.mir_graph.reset(newMIRGraph(&cu, &cu.arena));
    cu.mir_graph->InlineMethod(code_item, access_flags, invoke_type, class_def_idx, method_idx,class_loader, dex_file);
    cu.mir_graph->CodeLayout();
    cu.mir_graph->SSATransformation();
    cu.mir_graph->PropagateConstants();
    cu.mir_graph->MethodUseCount();
    cu.mir_graph->NullCheckElimination();
    cu.mir_graph->BasicBlockCombine();
    cu.mir_graph->BasicBlockOptimization();
    ……
    cu.cg.reset(ArmCodeGenerator(&cu, cu.mir_graph.get(), &cu.arena));
    ……
    cu.cg->Materialize();
    result = cu.cg->GetCompiledMethod();
    returnresult;
}
在这个过程中牵涉了几种重要的数据结构:
#!java
classMIRGraph {
……
BasicBlock* entry_block_;
BasicBlock* exit_block_;
BasicBlock* cur_block_;
intnum_blocks_;
 ……
}
structBasicBlock {
  ……
MIR* first_mir_insn;
MIR* last_mir_insn;
BasicBlock* fall_through;
BasicBlock* taken;
BasicBlock* i_dom;                // Immediate dominator.
 ……
};
structMIR {
DecodedInstructiondalvikInsn;
……
MIR* prev;
MIR* next;
 ……
};
structDecodedInstruction {
uint32_tvA;
uint32_tvB;
uint64_tvB_wide;        /* for k51l */
uint32_tvC;
uint32_targ[5];         /* vC/D/E/F/G in invoke or filled-new-array */
Instruction::Codeopcode;

explicitDecodedInstruction(constInstruction* inst) {
inst->Decode(vA, vB, vB_wide, vC, arg);
opcode = inst->Opcode();
  }
};
这几个数据结构的关系如图所示:
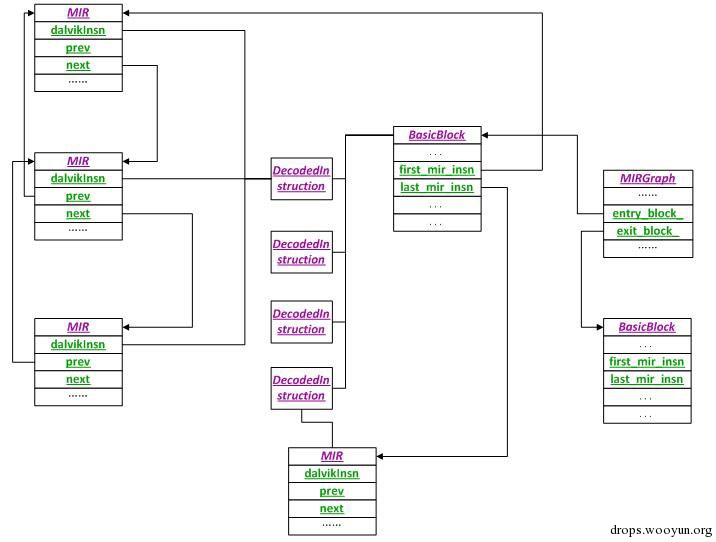
简单地说,一个MIRGraph对应着一个编译单元即一个方法,对一个方法进行控制流分析,划分出BasicBlock,并在BasicBlock中的fall_through和taken域中指向下一个BasicBlock(适用于分支出口)。每一个BasicBlock包含若干dalvik指令,每一天dalvik指令被翻译为若干MIR语句,这些MIR结构体之间形成双向链表。每一个BasicBlock也指示了第一条和最后一条MIR语句。
InlineMethod函数主要是解析一个方法,并划分BasicBlock边界,但是只是简单地把BasicBlock连接成一个链表,利用fall_through指示。
在CodeLayout函数中具体地再次遍历BasicBlock链表,并根据每个BasicBlock出口的指令,再次调整taken域和fall_through域,形成完整的控制流图结构。
SSATransformation函数是对每条指令进行静态单赋值变换。先对控制流图进行深度优先遍历,并计算出BasicBlock之间的支配关系,插入Phi函数,并对变量进行命名更新。
其余的方法主要是一些代码优化过程,例如常量传播、消除空指针检查;并在BasicBlock组合之后再进行BasicBlock的优化,消除冗余指令。
这样基本上就完成了MIR的生成过程,在某种程度上,可以认为MIR即为对dalvik指令进行SSA变换之后的指令形态。
接着就调用cu.cg->Materialize()用来产生最终代码。cu.cg在之前的代码被指向了Mir2Lir对象,所以调用的是:
#!java
voidMir2Lir::Materialize() {
CompilerInitializeRegAlloc();  // Needs to happen after SSA naming

/* Allocate Registers using simple local allocation scheme */
SimpleRegAlloc();

 ……
/* Convert MIR to LIR, etc. */
if (first_lir_insn_ == NULL) {
MethodMIR2LIR();
  }

/* Method is not empty */
if (first_lir_insn_) {
// mark the targets of switch statement case labels
ProcessSwitchTables();

/* Convert LIR into machine code. */
AssembleLIR();

  ……
  }
}
其中重要的两个调用就是MethodMIR2LIR()和AssembleLIR()。
#!java
MethodMIR2LIR将MIR转化为LIR,遍历每个BasicBlock,对每个基本块执行MethodBlockCodeGen,本质上最后是执行了CompileDalvikInstruction。

voidMir2Lir::CompileDalvikInstruction(MIR* mir, BasicBlock* bb, LIR* label_list) {
  ……
Instruction::Codeopcode = mir->dalvikInsn.opcode;
intopt_flags = mir->optimization_flags;
uint32_tvB = mir->dalvikInsn.vB;
uint32_tvC = mir->dalvikInsn.vC;

……
switch (opcode) {
case XXX:
GenXXXXXX(……)
default:
LOG(FATAL) <<"Unexpected opcode: "<<opcode;
  }
}
也就是通过解析指令,然后根据opcode进行分支判断,调用最终不同的指令生成函数。最后将LIR之间也形成一个双向链表。
AssembleLIR最终调用的是AssembleInstructions函数。程序中维护了一个编码指令表ArmMir2Lir::EncodingMap,AssembleInstructions即是通过查找这个表来进行翻译,将LIR转化为了ARM指令,并将所翻译的指令存储到CodeBufferMir2Lir::code_buffer_之中。
这样就完成了一次编译的完整流程。
ART环境中的JNI接口与Dalvik同样符合JVM标准,但是其中的实现却有所不同。以下通过三个过程来进行简述。
1、类加载初始化
首先观察一个native的java成员方法通过dex2oat编译后的结果:
java.lang.Stringcom.example.hellojni.HelloJni.stringFromJNI() (dex_method_idx=9)
    DEX CODE:
    CODE: 0xb6bfd1ac (offset=0x000011ac size=148)...
      0xb6bfd1ac: e92d4de0  stmdbsp!, {r5, r6, r7, r8, r10, r11, lr}
      0xb6bfd1b0: e24dd024  sub     sp, sp, #36
      0xb6bfd1b4: e58d0000  str     r0, [sp, #0]
      0xb6bfd1b8: e58d1044  str     r1, [sp, #68]
      0xb6bfd1bc: e3a0c001  mov    r12, r0, #1
      0xb6bfd1c0: e58dc004  str     r12, [sp, #4]
      0xb6bfd1c4: e599c074  ldr     r12, [r9, #116]  ;top_sirt_
      0xb6bfd1c8: e58dc008  str     r12, [sp, #8]
      0xb6bfd1cc: e28dc004  add    r12, sp, #4
      0xb6bfd1d0: e589c074  str     r12, [r9, #116]  ;top_sirt_
      0xb6bfd1d4: e59dc044  ldr     r12, [sp, #68]
      0xb6bfd1d8: e58dc00c  str     r12, [sp, #12]
      0xb6bfd1dc: e589d01c  strsp, [r9, #28]  ; 28
      0xb6bfd1e0: e3a0c000  mov    r12, r0, #0
      0xb6bfd1e4: e589c020  str     r12, [r9, #32]  ; 32
      0xb6bfd1e8: e1a00009  mov    r0, r9
      0xb6bfd1ec: e590c1b8  ldr  r12, [r0, #440] //qpoints->pJniMethodStart = JniMethodStart
      0xb6bfd1f0: e12fff3c  blx     r12
      0xb6bfd1f4: e58d0010  str     r0, [sp, #16]
      0xb6bfd1f8: e28d100c  add     r1, sp, #12
      0xb6bfd1fc: e5990024  ldr     r0, [r9, #36]  ;jni_env_
      0xb6bfd200: e59dc000  ldr     r12, [sp, #0]
      0xb6bfd204: e59cc048  ldr     r12, [r12, #72]
      0xb6bfd208: e12fff3c  blx     r12    // const void* ArtMethod::native_method_
      0xb6bfd20c: e59d1010  ldr     r1, [sp, #16]
      0xb6bfd210: e1a02009  mov    r2, r9
      0xb6bfd214: e592c1c8  ldr     r12, [r2, #456]
      0xb6bfd218: e12fff3c  blx r12//qpoints->pJniMethodEndWithReference= JniMethodEndWithReference
      0xb6bfd21c: e599c00c  ldr     r12, [r9, #12]  ; exception_
      0xb6bfd220: e35c0000  cmp     r12, #0
      0xb6bfd224: 1a000001  bne     +4 (0xb6bfd230)
      0xb6bfd228: e28dd03c  add     sp, sp, #60
      0xb6bfd22c: e8bd8000  ldmiasp!, {pc}
      0xb6bfd230: e1a0000c  mov     r0, r12
      0xb6bfd234: e599c260  ldr     r12, [r9, #608]  ;pDeliverException
      0xb6bfd238: e12fff3c  blx     r12
      0xb6bfd23c: e1200070  bkpt    #0
可以看到,它没有对应的dex code。
用伪码表示这个过程:
JniMethodStart(Thread*);
ArtMethod ::native_method_(…..);
JniMethodEndWithReference(……);
return;
基本上就是这三个函数的调用。
但是从ART的LoadClass的函数来分析,ArtMethod对象与真实执行的代码链接的过程主要是通过LinkCode函数执行的。
#!java
staticvoidLinkCode(SirtRef<mirror::ArtMethod>&method, constOatFile::OatClass* oat_class,
uint32_tmethod_index)
SHARED_LOCKS_REQUIRED(Locks::mutator_lock_) {
DCHECK(method->GetEntryPointFromCompiledCode() == NULL);
constOatFile::OatMethodoat_method = oat_class->GetOatMethod(method_index);
oat_method.LinkMethod(method.get());

Runtime* runtime = Runtime::Current();
boolenter_interpreter = NeedsInterpreter(method.get(), method->GetEntryPointFromCompiledCode());
if (enter_interpreter) {  method->SetEntryPointFromInterpreter(interpreter::artInterpreterToInterpreterBridge);
} else{ method->SetEntryPointFromInterpreter(artInterpreterToCompiledCodeBridge);
 }

if (method->IsAbstract()) { method->SetEntryPointFromCompiledCode(GetCompiledCodeToInterpreterBridge());
return;
  }

if (method->IsStatic() && !method->IsConstructor()) {
method->SetEntryPointFromCompiledCode(GetResolutionTrampoline(runtime->GetClassLinker()));
  } elseif (enter_interpreter) {
method->SetEntryPointFromCompiledCode(GetCompiledCodeToInterpreterBridge());
  }

if (method->IsNative()) {
method->UnregisterNative(Thread::Current());
  }

runtime->GetInstrumentation()->UpdateMethodsCode(method.get(),
method->GetEntryPointFromCompiledCode());
}
可以看到,在LinkCode的开始就将通过oat_method.LinkMethod(method.get())将对象与代码进行了链接,但是在后边又针对几种特殊情况做了一些处理,包括解释执行入口和静态方法等等。我们主要关注的是JNI方法,即
if (method->IsNative()) {
method->UnregisterNative(Thread::Current());
  }
展开函数:
#!java
voidArtMethod::UnregisterNative(Thread* self) {
CHECK(IsNative()) <<PrettyMethod(this);
RegisterNative(self, GetJniDlsymLookupStub());
}

extern"C"void* art_jni_dlsym_lookup_stub(JNIEnv*, jobject);
staticinlinevoid* GetJniDlsymLookupStub() {
returnreinterpret_cast<void*>(art_jni_dlsym_lookup_stub);
}

voidArtMethod::RegisterNative(Thread* self, constvoid* native_method) {
DCHECK(Thread::Current() == self);
CHECK(IsNative()) <<PrettyMethod(this);
CHECK(native_method != NULL) <<PrettyMethod(this);
if (!self->GetJniEnv()->vm->work_around_app_jni_bugs) {
SetNativeMethod(native_method);
  } else {
SetNativeMethod(reinterpret_cast<void*>(art_work_around_app_jni_bugs));
SetFieldPtr<constuint8_t*>(OFFSET_OF_OBJECT_MEMBER(ArtMethod, gc_map_),
reinterpret_cast<constuint8_t*>(native_method), false);
  }
}

voidArtMethod::SetNativeMethod(constvoid* native_method) {
SetFieldPtr<constvoid*>(OFFSET_OF_OBJECT_MEMBER(ArtMethod, native_method_),
native_method, false);
}
很清晰可以看到,在类加载的时候是把ArtMethod的native_method_成员设置为了art_jni_dlsym_lookup_stub函数,那么在执行JNI方法的时候就会执行art_jni_dlsym_lookup_stub函数。
2、通过java调用JNI方法
从art_jni_dlsym_lookup_stub函数入手,这个函数使用汇编写的,与具体的平台相关。
ENTRYart_jni_dlsym_lookup_stub
push   {r0, r1, r2, r3, lr}           @ spillregs
    .save  {r0, r1, r2, r3, lr}
    .pad #20
    .cfi_adjust_cfa_offset20
subsp, #12                        @ padstackpointertoalignframe
    .pad #12
    .cfi_adjust_cfa_offset12
blxartFindNativeMethod
movr12, r0                        @ saveresultinr12
addsp, #12                        @ restorestackpointer
    .cfi_adjust_cfa_offset -12
cbzr0, 1f                         @ ismethodcodenull?
pop    {r0, r1, r2, r3, lr}           @ restoreregs
    .cfi_adjust_cfa_offset -20
bxr12                            @ ifnon-null, tailcalltomethod's code
1:
    .cfi_adjust_cfa_offset 20
pop    {r0, r1, r2, r3, pc}           @ restore regs and return to caller to handle exception
    .cfi_adjust_cfa_offset -20
END art_jni_dlsym_lookup_stub
主要的过程就是先调用artFindNativeMethod得到真正的native code的地址,然后在跳转到相应地址去执行,即对应了
blxartFindNativeMethod
bxr12                            @ ifnon-null, tailcalltomethod's code
两条指令。
#!java
extern"C"void* artFindNativeMethod() {
Thread* self = Thread::Current();
Locks::mutator_lock_->AssertNotHeld(self);
ScopedObjectAccesssoa(self);

mirror::ArtMethod* method = self->GetCurrentMethod(NULL);
DCHECK(method != NULL);

void* native_code = soa.Vm()->FindCodeForNativeMethod(method);
if (native_code == NULL) {
DCHECK(self->IsExceptionPending());
returnNULL;
  } else {
method->RegisterNative(self, native_code);
returnnative_code;
  }
}
主要的过程也就是查找到相应方法的native code,然后再次设置ArtMethod的native_method_成员,这样以后再执行的时候就直接跳到了native code执行了。
3、Native方法中调用java方法
这个主要是通过JNIEnv来间接调用的。JNIEnv中维持了许多JNI API可以被native code来使用。C和C++的实现形式略有不同,C++是对C的事先进行了一个简单的包装,具体可以参见jni.h。这里为了便于叙述以C为例。
#!java
typedefconststructJNINativeInterface* JNIEnv;
structJNINativeInterface {
void*       reserved0;
void*       reserved1;
void*       reserved2;
void*       reserved3;
jint        (*GetVersion)(JNIEnv *);
jclass      (*DefineClass)(JNIEnv*, constchar*, jobject, constjbyte*,  jsize);
jclass      (*FindClass)(JNIEnv*, constchar*);
…………
…………
jobject     (*NewDirectByteBuffer)(JNIEnv*, void*, jlong);
void*       (*GetDirectBufferAddress)(JNIEnv*, jobject);
jlong       (*GetDirectBufferCapacity)(JNIEnv*, jobject);
jobjectRefType (*GetObjectRefType)(JNIEnv*, jobject);
};
这些API以函数指针的形式存在,并在libart.so中实现,在整个art的初始化的过程中进行了对应。
在libart.so中的对应:
#!java
constJNINativeInterfacegJniNativeInterface = {
NULL,  // reserved0.
NULL,  // reserved1.
NULL,  // reserved2.
NULL,  // reserved3.
JNI::GetVersion,
JNI::DefineClass,
JNI::FindClass,
…………
…………
JNI::NewDirectByteBuffer,
JNI::GetDirectBufferAddress,
JNI::GetDirectBufferCapacity,
JNI::GetObjectRefType,
};
下面以一个常见的native code调用java的过程进行下分析:
(*pEnv)->FindClass(……);
getMethodID(……);
(*pEnv)->CallVoidMethod(……);
即查找类,得到相应的方法的ID,然后通过此ID去调用。
#!java
staticjclassFindClass(JNIEnv* env, constchar* name) {
CHECK_NON_NULL_ARGUMENT(FindClass, name);
Runtime* runtime = Runtime::Current();
ClassLinker* class_linker = runtime->GetClassLinker();
std::stringdescriptor(NormalizeJniClassDescriptor(name));
ScopedObjectAccesssoa(env);
Class* c = NULL;
if (runtime->IsStarted()) {
ClassLoader* cl = GetClassLoader(soa);
      c = class_linker->FindClass(descriptor.c_str(), cl);
    } else {
      c = class_linker->FindSystemClass(descriptor.c_str());
    }
returnsoa.AddLocalReference<jclass>(c);
  }
可以看到JNI中的FindClass实际调用的是ClassLinker::FindClass,这与ART的类加载过程一致。
#!java
staticvoidCallVoidMethod(JNIEnv* env, jobjectobj, jmethodIDmid, ...) {
va_listap;
va_start(ap, mid);
CHECK_NON_NULL_ARGUMENT(CallVoidMethod, obj);
CHECK_NON_NULL_ARGUMENT(CallVoidMethod, mid);
ScopedObjectAccesssoa(env);
InvokeVirtualOrInterfaceWithVarArgs(soa, obj, mid, ap);
va_end(ap);
  }
最后调用的是ArtMethod::Invoke()。
可以说如出一辙,即JNI的这些API其实还是做了一遍ART的类加载和初始化及调用的过程。